Email

Resolving the Issue of "DMARC Policy Not Enabled"

Published on
April 1, 2025

How to Fix "DMARC Quarantine/Reject Policy Not Enabled"

Receiving notifications about a missing or ineffective DMARC quarantine/reject policy?

These notifications indicate that your domain is currently configured with a DMARC policy of "none," which only allows monitoring without providing any protection against spoofing or protection to your email deliverability.

If you are on Cloudflare, GoDaddy or any other, follow this simple guide to resolve the issue and strengthen your domain's email security.

Check your DMARC using our Email Score Tool.

Step 1: Check Your Existing DMARC Record

Verify your current DMARC configuration using a DNS checker. Your DMARC record typically looks like this:

v=DMARC1; p=none; rua=mailto:reports@example.com;


Here's a DNS Lookup Tool
to quickly checks your current DMARC record.

Identify what is your current DMARC policy by looking at the "p=" tag.

Step 2: Understand DMARC Policies

  • None: Monitors email activity without enforcing any action—good for initial analysis but provides no security.
  • Quarantine: Directs suspicious emails to recipients' spam folders.
  • Reject: Blocks unauthorized emails from delivery entirely
     

Step 3: Enable Initial Monitoring

Start with a p=none policy to gather data on your email streams and authenticate SPF and DKIM alignments. This will generate XML reports that looks like this:

You can perform this monitoring manually, receiving complex DMARC reports directly in your inbox, or you can simplify the process by using a dedicated monitoring tool.

It's important to let XML reports collect data for at least one full cycle of email sending. A complete email sending cycle includes emails sent by all third-party applications (marketing and transactional), allowing you to fully assess SPF and DKIM alignment.

Step 4: Analyze DMARC Reports and Align SPF/DKIM

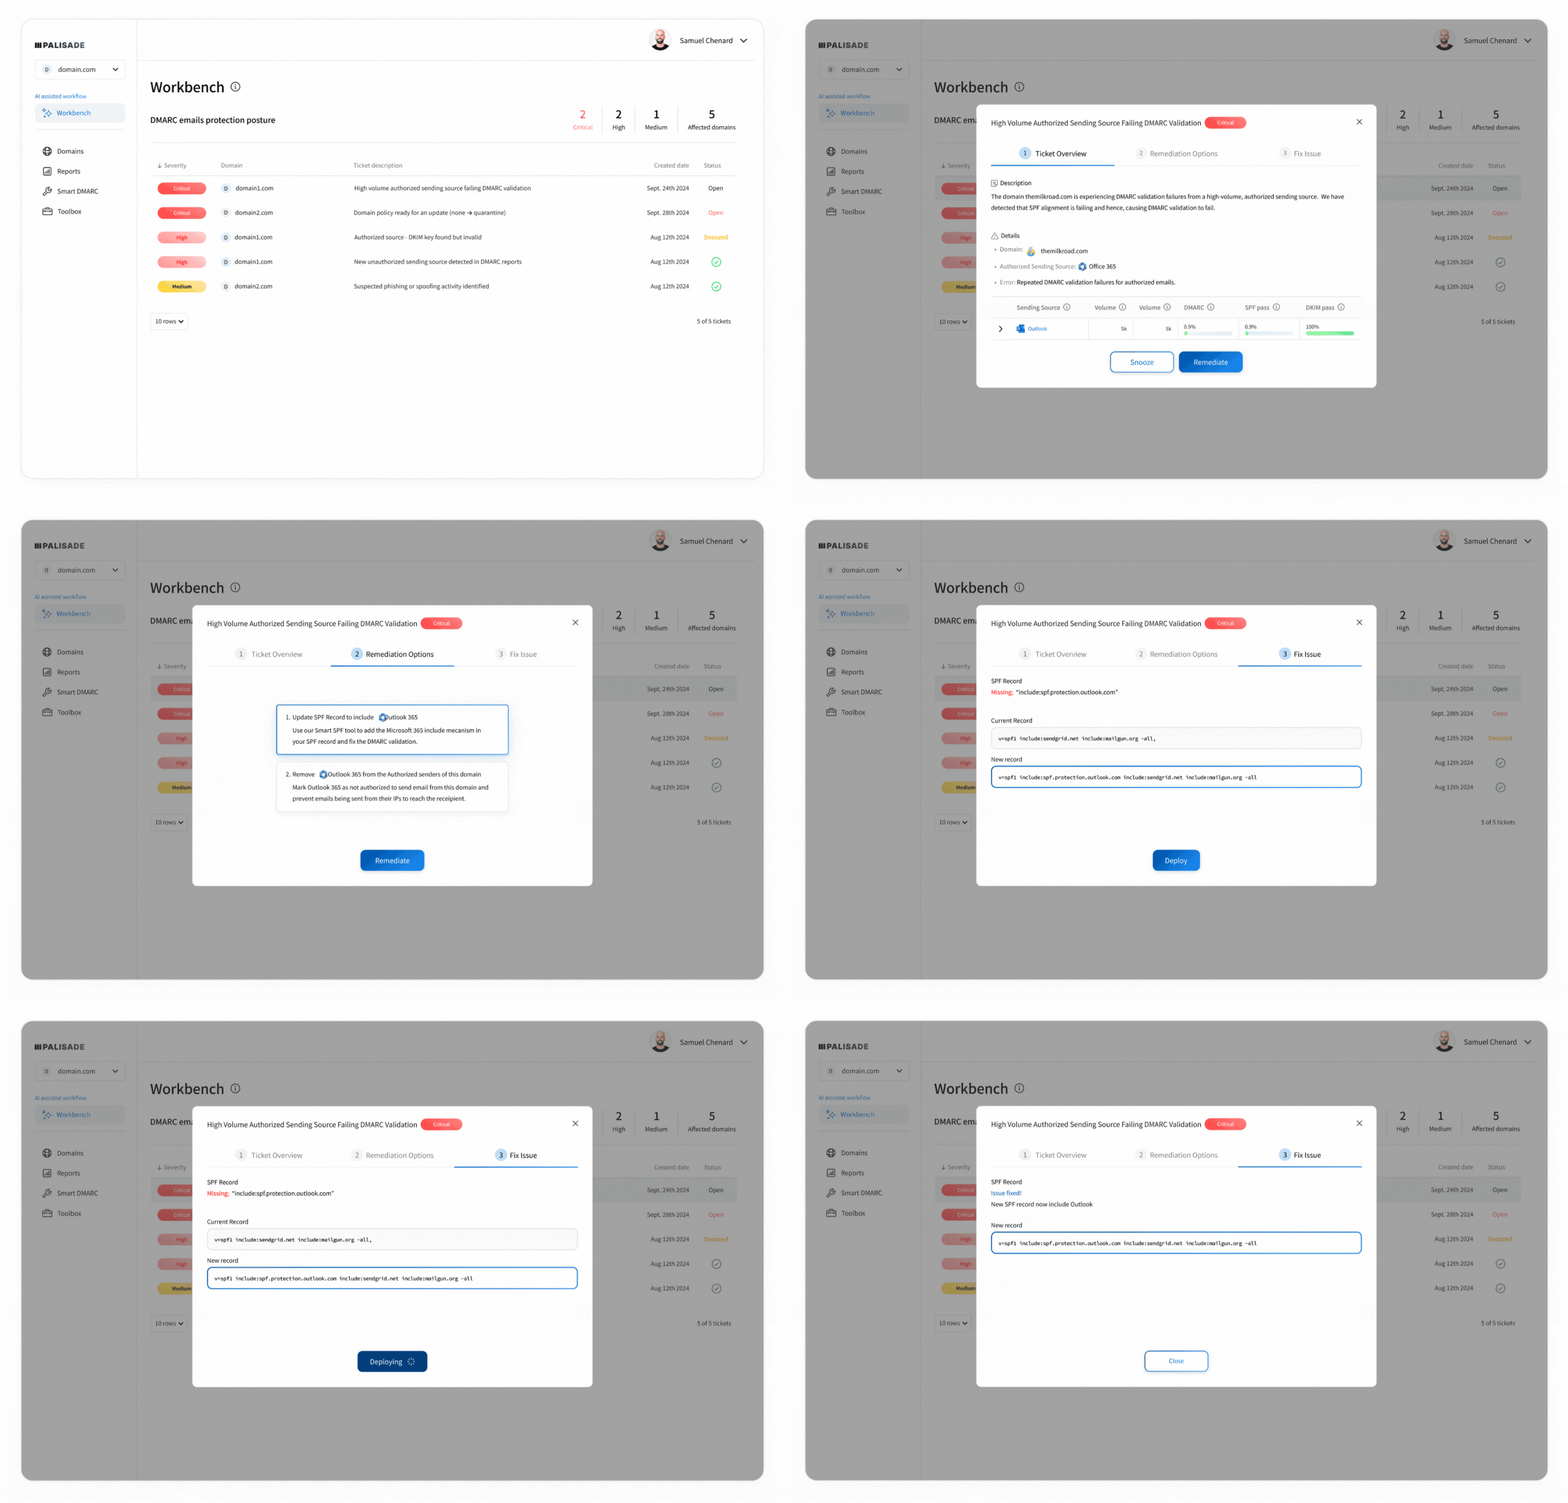
Monitor your DMARC XML reports to identify which authorized senders are successfully passing SPF and DKIM, and which ones are failing. For each sender failing these checks, update your SPF records and DKIM keys accordingly. Only after confirming that all legitimate senders are properly aligned should you enforce a stronger policy.

Using a DMARC platform simplifies this monitoring and alignment process, providing clear insights on sender compliance and recommended actions to easily resolve SPF and DKIM issues.
Step 5: Update DMARC Policy to Quarantine or Reject

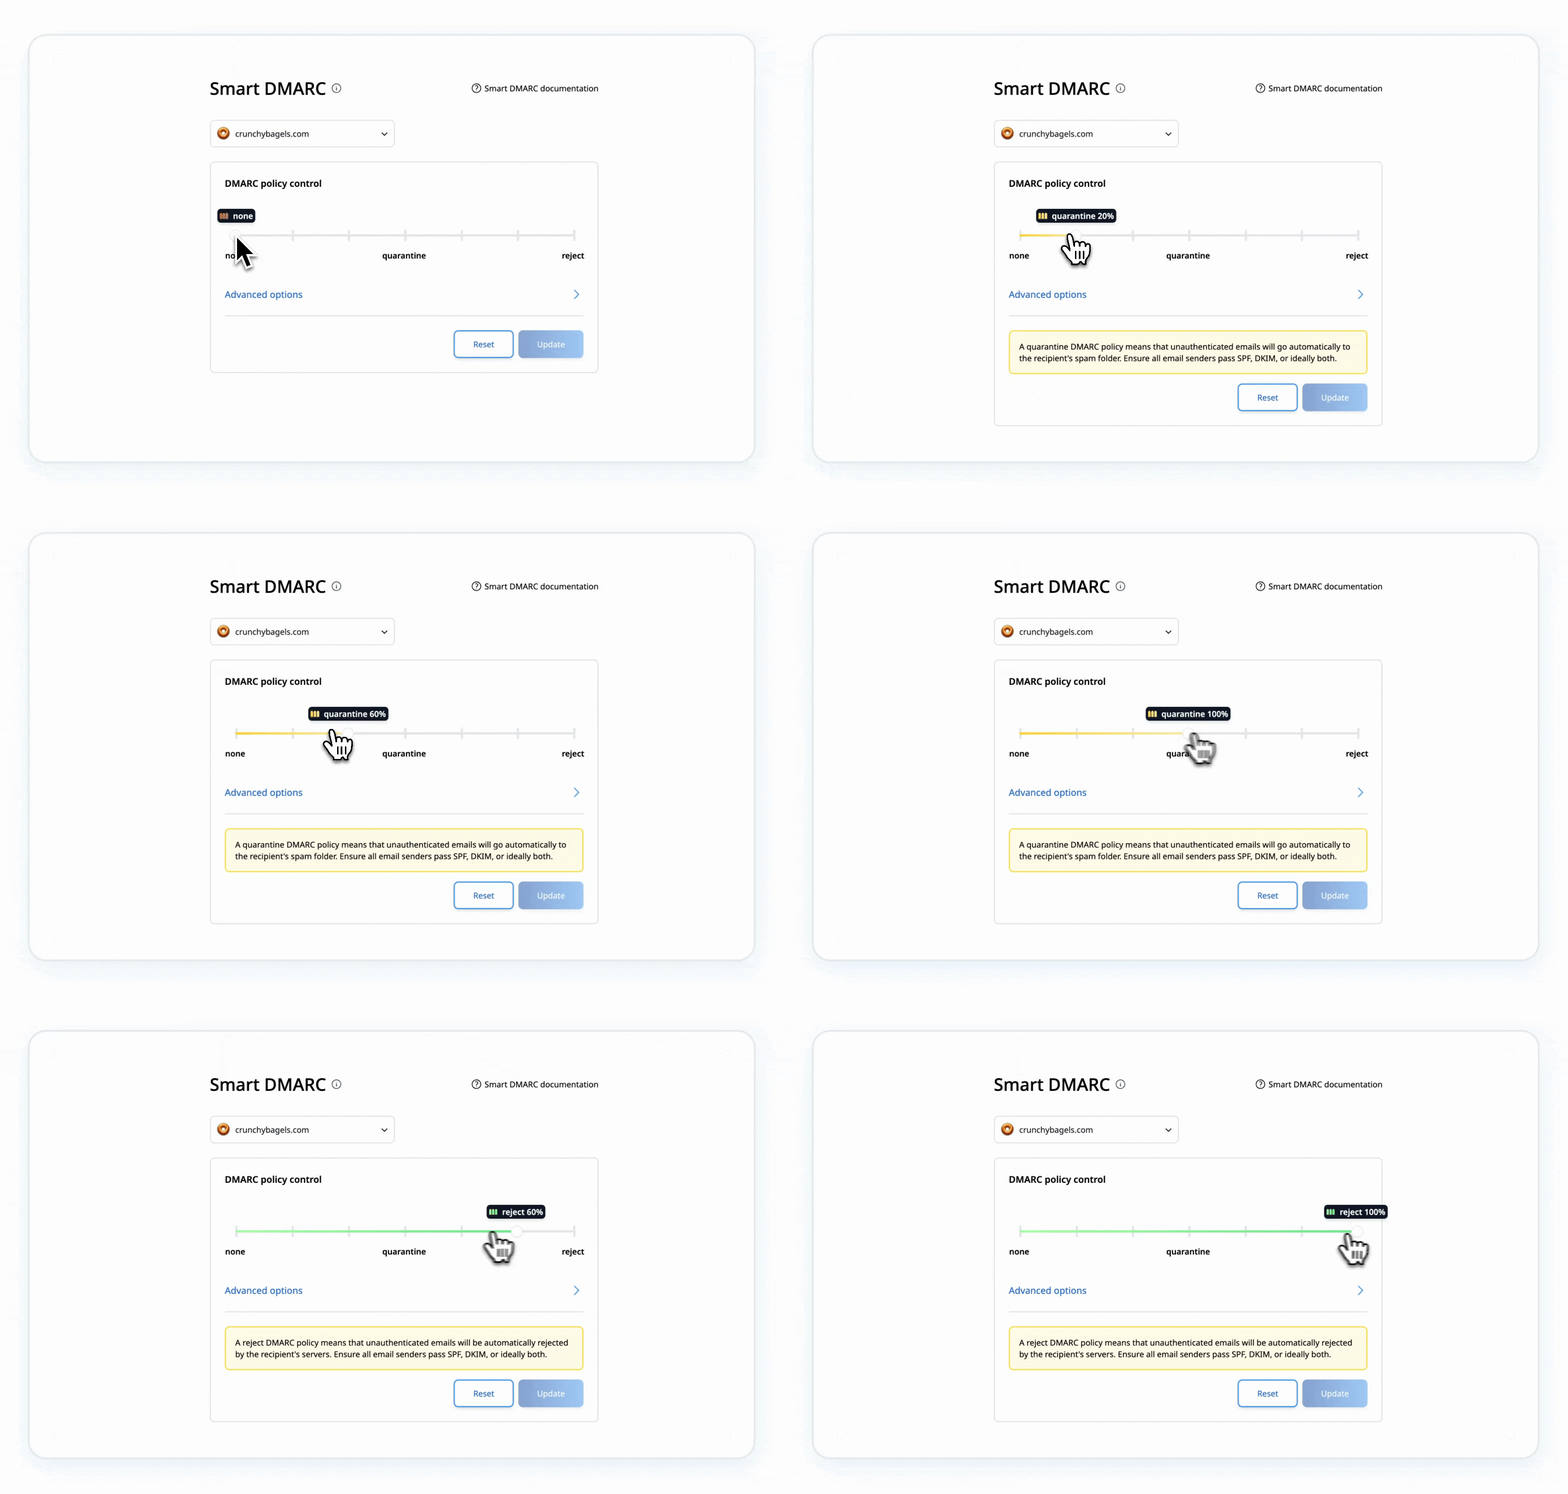
Once SPF and DKIM are aligned and verified through monitoring, upgrade your policy:

  • Example for Quarantine:
v=DMARC1; p=quarantine; rua=mailto:reports@example.com;
  • Example for Reject:
v=DMARC1; p=reject; rua=mailto:reports@example.com;

Using a DMARC platform simplifies updating your DMARC records, minimizing manual DNS modifications.
Step 6: Regularly Monitor and Adjust

Continuously review DMARC reports to ensure your policy effectively protects your domain without affecting legitimate emails.

Palisade’s DMARC AI monitoring tools provide clear, actionable insights, alerting you to any issues instantly.

Fixing "DMARC Policy Not Enabled" on Cloudflare
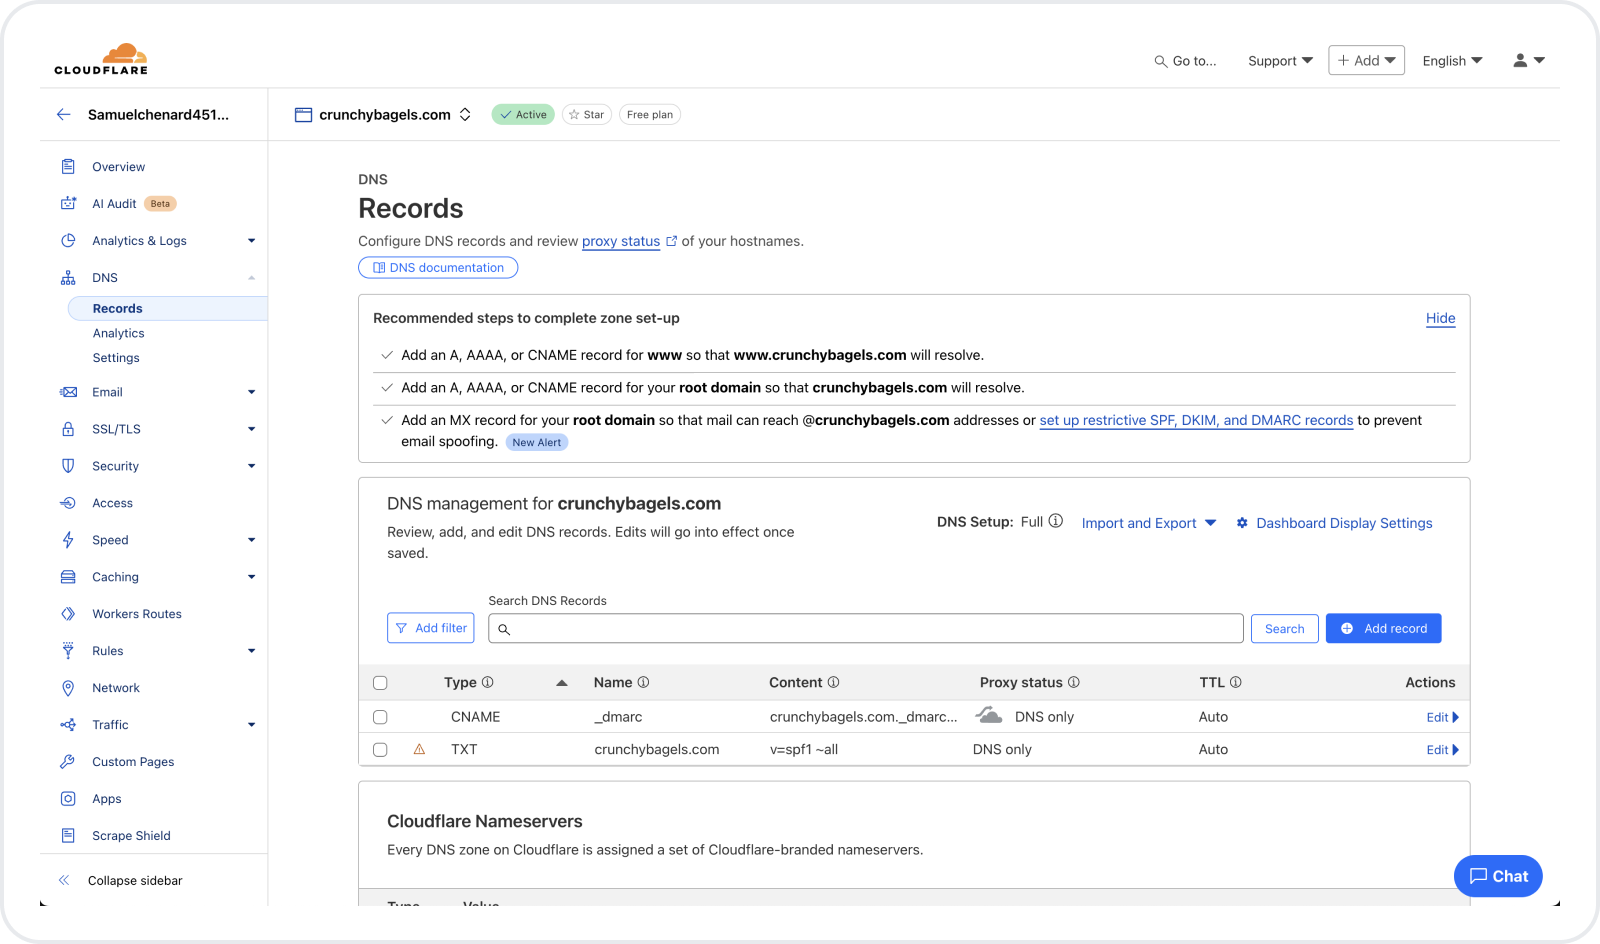
If you use Cloudflare and encounter this issue, follow these steps:Step 1: Log into Cloudflare

Access your DNS management section within your Cloudflare dashboard.

Step 2: Select Domain and Navigate to DNS

Choose your domain and click on "DNS" in the sidebar.

Step 3: Add a New DMARC Record with Quarantine or Reject Policy

Click "Add Record," then:

  • Set Type to TXT.
  • Name as _dmarc.
  • Paste your DMARC record (e.g., v=DMARC1; p=none; rua=mailto:reports@example.com;)
  • Save changes.

Note: Only implement a quarantine or reject policy once your DMARC monitoring confirms that SPF and DKIM alignments are 100% accurate.

Quickly create accurate DMARC records using a DMARC generator tool.

Fixing Warning "DMARC Policy Not Enabled for GoDaddy"

If you're encountering the warning "DMARC Policy Not Enabled for GoDaddy," follow these steps:

  1. Log in to your GoDaddy account and access your DNS settings.
  2. Navigate to DNS Management, select your domain, and click the "DNS" tab.
  3. Add a new TXT record:
    • Set Type as TXT.
    • Enter _dmarc in the Name field.
    • Use a DMARC policy with p=non
    • Save the record and allow up to 48 hours for propagation.
    • Regularly monitor reports to ensure proper alignment.

Best Practices to resolve "DMARC Policy Not Enabled"

Enabling a quarantine/reject DMARC policy isn't a one-time fix. Maintain security by regularly:

  • Reviewing DMARC reports.
  • Ensuring continuous SPF and DKIM alignment.

Use our Email Security Score to quickly evaluate your domain’s security and manage your DMARC setup effortlessly with the Palisade App.

Secure your email, secure your brand.

FAQ

What does "DMARC Quarantine/Reject Policy Not Enabled" mean?

This means your current DMARC settings don't actively block unauthorized emails, leaving your domain vulnerable to spoofing and phishing attacks.

Why is it important to enable a quarantine or reject policy?

A quarantine or reject policy is crucial to:

  • Protect your brand reputation by preventing unauthorized use.
  • Avoid being blacklisted as unsafe by email servers.
  • Maintain trust with customers by demonstrating strong security practices.

What's the difference between a quarantine and a reject policy?

  • Quarantine Policy: Suspicious emails are delivered to recipients' spam folders.
  • Reject Policy: Emails failing authentication checks are blocked and never reach the recipient.

Check your current security status easily using the Email Security Score tool.

How can I check my current DMARC settings?

Use tools like DMARC Checker or command-line utilities (such as dig) to verify your DMARC record. Ensure the policy (p= tag) is set to either "quarantine" or "reject," not "none."

What should I do before changing my DMARC policy?

Ensure proper alignment of SPF and DKIM records to avoid legitimate emails being mistakenly flagged. Tools like the App can help simplify this process.

Should I monitor my DMARC reports?

Yes, monitoring (rua, ruf) DMARC reports is critical. They provide insight into email activity and allow fine-tuning of your settings. The App handles monitoring automatically.

Is managing DMARC complicated?

Manual DMARC management can be complex, especially for multiple domains. A management tool like can simplify and secure your DMARC implementation.

What are the best practices for implementing DMARC?

  • Start with Quarantine: Begin with quarantine to monitor initial results.
  • Gradually move to Reject: Once confident, escalate to reject.
  • Maintain SPF and DKIM Alignment: Always ensure these are aligned and correctly configured.
  • Regularly Test and Adjust: Analyze DMARC reports regularly and adjust policies as needed.

What challenges might I face when setting up DMARC?

  • Misconfigured SPF/DKIM: Regularly check and correct these.
  • False Positives: Monitor carefully after changes to prevent legitimate emails from being marked incorrectly.

Are there any limitations to DMARC?

DMARC’s effectiveness depends on server compliance and sender adherence to email standards. To maximize security:

  • Prefer using reject over quarantine to fully block threats.
  • Always complement DMARC with SPF and DKIM for stronger protection.

Regular maintenance and updates ensure ongoing effectiveness.

Published on
April 1, 2025
Author
Samuel Chenard - Founder & CEO
Email Performance Score
Improve results with AI- no technical skills required

Resolving the Issue of "DMARC Policy Not Enabled"

Published on
April 1, 2025
Contributors
Dominic Landry
Email security specialist
Subscribe to our newsletter
Read about our privacy policy.
Thank you! Your submission has been received!
Oops! Something went wrong while submitting the form.

How to Fix "DMARC Quarantine/Reject Policy Not Enabled"

Receiving notifications about a missing or ineffective DMARC quarantine/reject policy?

These notifications indicate that your domain is currently configured with a DMARC policy of "none," which only allows monitoring without providing any protection against spoofing or protection to your email deliverability.

If you are on Cloudflare, GoDaddy or any other, follow this simple guide to resolve the issue and strengthen your domain's email security.

Check your DMARC using our Email Score Tool.

Step 1: Check Your Existing DMARC Record

Verify your current DMARC configuration using a DNS checker. Your DMARC record typically looks like this:

v=DMARC1; p=none; rua=mailto:reports@example.com;


Here's a DNS Lookup Tool
to quickly checks your current DMARC record.

Identify what is your current DMARC policy by looking at the "p=" tag.

Step 2: Understand DMARC Policies

  • None: Monitors email activity without enforcing any action—good for initial analysis but provides no security.
  • Quarantine: Directs suspicious emails to recipients' spam folders.
  • Reject: Blocks unauthorized emails from delivery entirely
     

Step 3: Enable Initial Monitoring

Start with a p=none policy to gather data on your email streams and authenticate SPF and DKIM alignments. This will generate XML reports that looks like this:

You can perform this monitoring manually, receiving complex DMARC reports directly in your inbox, or you can simplify the process by using a dedicated monitoring tool.

It's important to let XML reports collect data for at least one full cycle of email sending. A complete email sending cycle includes emails sent by all third-party applications (marketing and transactional), allowing you to fully assess SPF and DKIM alignment.

Step 4: Analyze DMARC Reports and Align SPF/DKIM

Monitor your DMARC XML reports to identify which authorized senders are successfully passing SPF and DKIM, and which ones are failing. For each sender failing these checks, update your SPF records and DKIM keys accordingly. Only after confirming that all legitimate senders are properly aligned should you enforce a stronger policy.

Using a DMARC platform simplifies this monitoring and alignment process, providing clear insights on sender compliance and recommended actions to easily resolve SPF and DKIM issues.

Step 5: Update DMARC Policy to Quarantine or Reject

Once SPF and DKIM are aligned and verified through monitoring, upgrade your policy:

  • Example for Quarantine:
v=DMARC1; p=quarantine; rua=mailto:reports@example.com;
  • Example for Reject:
v=DMARC1; p=reject; rua=mailto:reports@example.com;

Using a DMARC platform simplifies updating your DMARC records, minimizing manual DNS modifications.

Step 6: Regularly Monitor and Adjust

Continuously review DMARC reports to ensure your policy effectively protects your domain without affecting legitimate emails.

Palisade’s DMARC AI monitoring tools provide clear, actionable insights, alerting you to any issues instantly.

Fixing "DMARC Policy Not Enabled" on Cloudflare

If you use Cloudflare and encounter this issue, follow these steps:Step 1: Log into Cloudflare

Access your DNS management section within your Cloudflare dashboard.

Step 2: Select Domain and Navigate to DNS

Choose your domain and click on "DNS" in the sidebar.

Step 3: Add a New DMARC Record with Quarantine or Reject Policy

Click "Add Record," then:

  • Set Type to TXT.
  • Name as _dmarc.
  • Paste your DMARC record (e.g., v=DMARC1; p=none; rua=mailto:reports@example.com;)
  • Save changes.

Note: Only implement a quarantine or reject policy once your DMARC monitoring confirms that SPF and DKIM alignments are 100% accurate.

Quickly create accurate DMARC records using a DMARC generator tool.

Fixing Warning "DMARC Policy Not Enabled for GoDaddy"

If you're encountering the warning "DMARC Policy Not Enabled for GoDaddy," follow these steps:

  1. Log in to your GoDaddy account and access your DNS settings.
  2. Navigate to DNS Management, select your domain, and click the "DNS" tab.
  3. Add a new TXT record:
    • Set Type as TXT.
    • Enter _dmarc in the Name field.
    • Use a DMARC policy with p=non
    • Save the record and allow up to 48 hours for propagation.
    • Regularly monitor reports to ensure proper alignment.

Best Practices to resolve "DMARC Policy Not Enabled"

Enabling a quarantine/reject DMARC policy isn't a one-time fix. Maintain security by regularly:

  • Reviewing DMARC reports.
  • Ensuring continuous SPF and DKIM alignment.

Use our Email Security Score to quickly evaluate your domain’s security and manage your DMARC setup effortlessly with the Palisade App.

Secure your email, secure your brand.

FAQ

What does "DMARC Quarantine/Reject Policy Not Enabled" mean?

This means your current DMARC settings don't actively block unauthorized emails, leaving your domain vulnerable to spoofing and phishing attacks.

Why is it important to enable a quarantine or reject policy?

A quarantine or reject policy is crucial to:

  • Protect your brand reputation by preventing unauthorized use.
  • Avoid being blacklisted as unsafe by email servers.
  • Maintain trust with customers by demonstrating strong security practices.

What's the difference between a quarantine and a reject policy?

  • Quarantine Policy: Suspicious emails are delivered to recipients' spam folders.
  • Reject Policy: Emails failing authentication checks are blocked and never reach the recipient.

Check your current security status easily using the Email Security Score tool.

How can I check my current DMARC settings?

Use tools like DMARC Checker or command-line utilities (such as dig) to verify your DMARC record. Ensure the policy (p= tag) is set to either "quarantine" or "reject," not "none."

What should I do before changing my DMARC policy?

Ensure proper alignment of SPF and DKIM records to avoid legitimate emails being mistakenly flagged. Tools like the App can help simplify this process.

Should I monitor my DMARC reports?

Yes, monitoring (rua, ruf) DMARC reports is critical. They provide insight into email activity and allow fine-tuning of your settings. The App handles monitoring automatically.

Is managing DMARC complicated?

Manual DMARC management can be complex, especially for multiple domains. A management tool like can simplify and secure your DMARC implementation.

What are the best practices for implementing DMARC?

  • Start with Quarantine: Begin with quarantine to monitor initial results.
  • Gradually move to Reject: Once confident, escalate to reject.
  • Maintain SPF and DKIM Alignment: Always ensure these are aligned and correctly configured.
  • Regularly Test and Adjust: Analyze DMARC reports regularly and adjust policies as needed.

What challenges might I face when setting up DMARC?

  • Misconfigured SPF/DKIM: Regularly check and correct these.
  • False Positives: Monitor carefully after changes to prevent legitimate emails from being marked incorrectly.

Are there any limitations to DMARC?

DMARC’s effectiveness depends on server compliance and sender adherence to email standards. To maximize security:

  • Prefer using reject over quarantine to fully block threats.
  • Always complement DMARC with SPF and DKIM for stronger protection.

Regular maintenance and updates ensure ongoing effectiveness.